” This is a hobby home automation project build using Django,Raspberry Pi,Xbees with aim to learn build mobile-server connection from scratch, working with somepopular elctronic modules (Raspberry Pi and XBees). “
This is a complete flowchart of underlying operations performed.
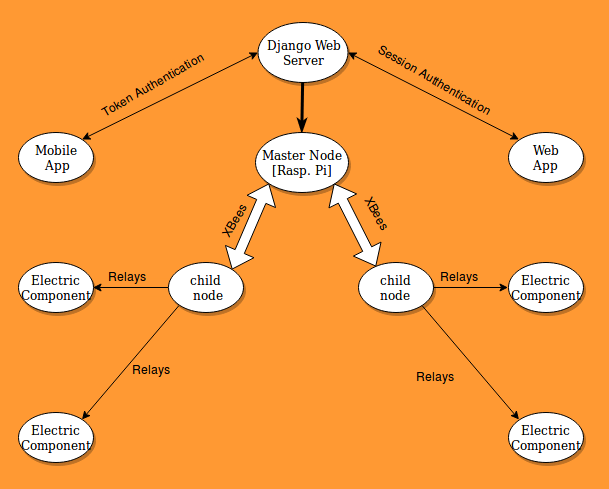
So clearly the important tasks of development are :
- Making Django Server
- Deploying to Heroku
- Connecting MasterNode, Raspberry Pi to Server
- Connecting Electronic components via Relays/ Xbees to Raspberry Pi
Making a Django Server
I assume you have a little bit knowledge of working in linux systems and you are familiar with django and pthon’s virtual environment.
let’s begin by creating a new virtual environment and activating the environment and then install our required dependencies.
-$ virtualenv Project-HA
-$ source Project-HA/bin/activate
The dependencies that we will be using are:
- Django (1.10)
- Django Rest Framework (3.5.0)
To install them simply type:
(Project-HA)-$ pip install django==1.10
(Project-HA)-$ pip install djangorestframework==3.5.0
We’ll then proceed by creating Project and app files.
(Project-HA)-$ django-admin startproject HomeAutomation
(Project-HA)-$ django-admin startapp API
(Project-HA)-$ django-admin startapp Accounts
Just to see if you have build things correctly try to run server by:
(Project-HA)-$ python manage.py runserverIgnore if you get errors of unapplied Migrations. Make sure that you see the “Congrats on your first django-powered page” default page on http://localhost:8000/
If you have reached here, It means you have successfully intialized the project. Let’s then proceed with actual coding.
Then create a superuser for our project using :
(Project-HA)-$ python manage.py createsuperuserMake login-logout system
Start by creating a templates folder inside the Accounts directory. Then create a folder named Accounts inside the previously created templates folder ( the directory structure will be something like this Accounts->templates->Accounts) and login.html and logout.html files inside it.
login.html
<form method="post" action="{% url 'accounts:login' %}">
  {% csrf_token %}
  Username: <input type='text' name='username' />
  <br>
  Password: <input type='password' name='password' />
  <br>
  <input type='submit' value='Login' />
</form>
logout.html
<script>
document.cookie = "token=; expires=Thu, 01 Jan 1970 00:00:01 GMT; path=/";
location.href="/accounts/auth/";
</script>
Then create views for login, logout logic as :
views.py
from django.conf import settings
from django.shortcuts import render, redirect
from django.contrib.auth import authenticate, login, logout

def logout_user(request):
    logout(request)
    return render(request, 'Accounts/logout.html', {})


def login_form(request):
    return render(request, 'Accounts/login.html', {})

def login_user(request):
    username = request.POST.get('username')
    password = request.POST.get('password')
    user = authenticate(username=username, password=password)
    if user is not None:
        # the password verified for the user
        if user.is_active:
            login(request, user)
            return redirect('/api/list')
    return redirect(settings.LOGIN_URL, request)
Basically We try to validate the requesting user by looking up for him in our user data model. And if foung redirect him to another place.
Try logging in using the created user’s username and password.
(NOTE : Here we’ve redirected the user to api/list which till now does not exist. Do not get confused for now we’ll see to this soon)
Making Complete Model structure
(I have decided to put in API application however you may put in whichever you like and change files accordingly.)
model.py
from __future__ import unicode_literals
from django.db import models
from django.contrib.auth.models import User
from django.core.validators import MaxValueValidator, MinValueValidator
'''
We are hereby adding min-max value validator so as
to normalize values between 0-100.
'''

class UserModel(models.Model):
    user = models.OneToOneField(User, on_delete=models.CASCADE,editable=True)

    user_name = models.CharField(null=False,default="helloworld",unique=True,max_length=50)

    MainSwitch = models.BooleanField(default=0)

    Item1Bool = models.BooleanField(default=0)
    Item1Value = models.IntegerField(default=0,validators=[
            MaxValueValidator(100),
            MinValueValidator(0)
        ])

    Item2Bool = models.BooleanField(default=0)
    Item2Value = models.IntegerField(default=0,validators=[
            MaxValueValidator(100),
            MinValueValidator(0)
        ])
    def save(self, *args, **kwargs):
        self.user_name = self.user.username
        super(UserModel, self).save(*args, **kwargs)

    def __unicode__(self):
        return self.label
(We’ll be dealing with data as user, the electric component’s state vlaue : its bool value and the intensity : the numerical Value)
What we did here is we created a table with name UserModel and added colums as User - Django’s generic user model , user_name - test type, MainSwitch - bool type data, ItemBool -bool type data , ItemValue - num type data. Though I have written example for 2 components only, you can expand it to as many you like.
We’ll now register this table to database using -
(Project-HA)-$ python manage.py makemigrations
(Project-HA)-$ python manage.py migrate
Since we are using Django’s Rest framework for our project, let’s first add serializers.py and then create views later .
serializers.py
from rest_framework import serializers
from django.contrib.auth.models import User

from .models import UserModel


class UserSerializer(serializers.ModelSerializer):
    class Meta:
        model = User
        fields = ('username', 'email', 'password')
        extra_kwargs = {'password': {'write_only': True}}

    def create(self, validated_data):
        user = User(
            email = validated_data["email"],
            username = validated_data["username"]
        )
        user.set_password(validated_data["password"])
        user.save()
        return user

'''
adding the create method here only because
we won't be using this UserSerializer class in
any other way.
'''

class ListSerializer(serializers.ModelSerializer):
    class Meta:
        model = UserModel
        fields = ('id','user_name','user','MainSwitch','Item1Bool',
            'Item1Value','Item2Bool','Item2Value'
            ,)
# to retrieve all the data of the usermodel.


class IdSerializer(serializers.ModelSerializer):
    class Meta:
        model = UserModel
        fields = ('id',)
'''
to retrieve ID of the usermodel for
a particular user.
'''

class UpdateSerializer(serializers.ModelSerializer):
    class Meta:
        model = UserModel
        fields = ('MainSwitch',Item1Bool','Item1Value','Item2Bool','Item2Value'
            ,)

# to mention the fields which will be updated.
views.py
from django.shortcuts import render
from rest_framework import generics
from rest_framework.mixins import UpdateModelMixin
from .models import UserModel
from .serializers import ListSerializer , UserSerializer , UpdateSerializer , IdSerializer
from django.contrib.auth.models import User
from django.http import HttpResponse

class UserCreate(generics.CreateAPIView):   # method to create user
  serializer_class = UserSerializer
  authentication_classes = ()
  permission_classes = ()

class GetId(generics.ListCreateAPIView):
  serializer_class = IdSerializer
  def get_queryset(self):
    requesting_user = self.request.user
    return UserModel.objects.filter(user=requesting_user)


class UserDetail(generics.RetrieveAPIView): # method to get details
  queryset = User.objects.all()
  serializer_class = UserSerializer

class SimpleList(generics.ListCreateAPIView):
  serializer_class = ListSerializer
  def get_queryset(self):
    requesting_user = self.request.user
    return UserModel.objects.filter(user=requesting_user)


class PartialUpdateView(generics.GenericAPIView, UpdateModelMixin):
    queryset = UserModel.objects.all()
    serializer_class = UpdateSerializer

    def put(self, request, *args, **kwargs):
      instance = self.get_object()
      if ((instance.user) != (self.request.user)):
        return HttpResponse("notallowed")
      else :
        return self.partial_update(request, *args, **kwargs)
'''
method to Update existing user's
electric component details
'''
For complete understanding of how the rest_framework’s generics work, refer to DRF generic views
Creating Paths
Now Since the model and views have been created, lets create the url paths.
Accounts/urls.py
from django.conf.urls import url
from django.conf import settings
from django.conf.urls.static import static

from . import views


urlpatterns = [
    url(r'^login/$', views.login_user, name='login'),
    url(r'^logout/$', views.logout_user, name='logout'),
    url(r'^auth/$',  views.login_form, name='login_form'),
] + static(settings.STATIC_URL, document_root=settings.STATIC_ROOT)
API/urls.py
from django.conf.urls import url
from django.conf import settings
from django.conf.urls.static import static
from rest_framework.authtoken import views as drfview
from . import views

from rest_framework import routers

router = routers.DefaultRouter()
router.register(r'^list/', views.SimpleList,base_name='list')


urlpatterns = [
    url(r'^list/$', views.SimpleList.as_view()),
    url(r'^create_user/$', views.UserCreate.as_view()),
    url(r'^update/(?P<pk>\d+)/$',views.PartialUpdateView.as_view(), name='update'),
    url(r'^get-auth-token/', drfview.obtain_auth_token),
    url(r'^get-id/',views.GetId.as_view()),
] + static(settings.STATIC_URL, document_root=settings.STATIC_ROOT)
We added the routing paths to /list - for complete list details, /create_user - to create a new user with username, email and password, get-auth-token - to get an auth token for the user to be used in his/her mobile app, get-id - to get the id of user.
Finally register the API model to be visible under the admin dashboard as :
API/admin.py
from django.contrib import admin
from .models import UserModel

admin.site.register(UserModel)
Let’s now configure the settings.py for verifying locally.
Settings.py
...

INSTALLED_APPS = [
    ...
    'Accounts',
    'API',
    'rest_framework',
    'rest_framework.authtoken',
]

...

REST_FRAMEWORK = {
    'DEFAULT_AUTHENTICATION_CLASSES': (
        'rest_framework.authentication.SessionAuthentication',
        'rest_framework.authentication.TokenAuthentication',


        # as discussed in flowchart, We'll use authtoken
        # for mobile clients and session authentication
        # for webapp.

    ),
    'DEFAULT_PERMISSION_CLASSES': (
        'rest_framework.permissions.IsAuthenticated',
    )
}

...

LOGIN_URL = '/accounts/auth'

PROJECT_ROOT = os.path.dirname(os.path.abspath(__file__))

STATIC_ROOT = os.path.join(PROJECT_ROOT, 'staticfiles')
STATIC_URL = '/static/'

STATICFILES_DIRS = (
    os.path.join(BASE_DIR, "static"),
)
...
Try running the server locally. If it works then we got our app working fine locally. Next we need to deploy our app to heroku.
Deploying to Heroku
- Create your heroku account if you do not have one by visiting https://www.heroku.com.
- Create a new app in the dash board and visit the deploy section.
- next Install their terminal heroku-cli using heroku-cli.
- We need to generate these required files Expected files for successful deployment of django to heroku.
- Since we’ll require storage for our application, go to resources and then in addons search-select heroku-postgresql.
- Next retrieve the database credentials
URIfrom heroku-postgresql settings. Let it be XXXXX.
install some depependencies :
(Project-HA)-$ pip install dj-database-url==0.4.2
(Project-HA)-$ pip install gunicorn==19.7.1
(Project-HA)-$ pip install whitenoise==3.3.1
(Project-HA)-$ pip install psycopg2==2.5.4
Next list out the dependencies using in the project home directory:
(Project-HA)-$ pip freeze > requirements.txtThen generate Pipfile using :
(Project-HA)-$ pip install pipenv
(Project-HA)-$ pipenv lock
This will generate the Pipfile and Pipfile.lock .
To tell heroku that our project is a WSGI type application, we need to generate a Procfile as :
Procfile
web: gunicorn HomeAutomation.wsgi --log-file -
We are now ready to change settings file for deployment. settings.py
...
MIDDLEWARE = [
    'whitenoise.middleware.WhiteNoiseMiddleware',
    ...
    ]

...

STATICFILES_STORAGE = 'whitenoise.django.GzipManifestStaticFilesStorage'

DATABASE_URL = 'XXXXX'
DATABASES = {'default': dj_database_url.config(default=DATABASE_URL)}


db_from_env = dj_database_url.config(conn_max_age=500)
DATABASES['default'].update(db_from_env)

SECURE_PROXY_SSL_HEADER = ('HTTP_X_FORWARDED_PROTO', 'https')

...
Now lets upload the code to heroku.
-# heroku login
-# heroku create
-# git push heroku master
-# heroku ps:scale web=1
-# herku open
run migration and creating superuser commands as :
-# heroku run python manage.py createsuperuser
-# heroku run python manage.py makemigrations
-# heroku run python manage.py migrate
Now the project should be working fine. Visit the project’s site to view it in action.
Connecting Pi to Server
For now we are simply connecting raspberry pi to Server and looping through to update the data every second.
(NOTE : This functionality however should be upgraded to make asynchronous calls. I have some part of this done at Advanced-Feature-Branch on https://github.com/SatyendraBanjare/Project-HomeAutomation )
install some dependencies in raspberry using:
-$ pip install requests(NOTE : I used raspbian os in raspberry pi while working in this and configured usb based connection of XBEE(master_node) with pi and also previously configured the XBEE(master_node) in AT MODE )
The final python script for our raspberry pi is :
import RPi.GPIO as GPIO
import serial

import requests
import time

ser = serial.Serial('/dev/ttyUSB0', 9600, timeout = 0.5)
GPIO.setwarnings(False)
GPIO.setmode(GPIO.BCM)
GPIO.setup(5,GPIO.OUT)
GPIO.setup(6,GPIO.OUT)
GPIO.setup(13,GPIO.OUT)
GPIO.setup(26,GPIO.OUT)

url = "YOUR_PROJECT_SITE/api/list/"

headers = {
    'Authorization': "Token XYXYXYXYX_THE_AUTH_TOKEN_FOR_A_USER ",
    'Cache-Control': "no-cache",
    }

while True:
    #try:
    response = requests.request("GET", url, headers=headers).json()
    #except ConnectionError:
     #   pass
    mainswitch=response[0]['MainSwitch']
    item1=response[0]['Item1Bool']
    item2=response[0]['Item2Bool']
    item3=response[0]['Item3Bool']
    item4=response[0]['Item4Bool']
    item5=response[0]['Item5Bool']
    item6=response[0]['Item6Bool']

    if mainswitch==True:
        GPIO.output(5,item1)
        GPIO.output(6,item2)
        GPIO.output(13,item3)
        GPIO.output(26,item4)
        if item5 == True and item6 == False:
            ser.write('1')
        if item5 == False and item6 == True:
            ser.write('2')
        if item5 == False and item6 == False:
            ser.write('3')
        if item5 == True and item6 == True:
            ser.write('4')
        time.sleep(0.05)

    else:
        GPIO.output(5,False)
        GPIO.output(6,False)
        GPIO.output(13,False)
        GPIO.output(26,False)
        ser.write('3')
        time.sleep(0.05)
This script demonstrates controlling 2 electric components corresponding to Item5 and Item6 via XBEES. Therefore there are accordingly 2^2 =4 cases possible. accordingly, we will send one out of those 4 case value to xbee.
There are also directly connected 4 elecctric components that can be controlled directly from raspberry pi corresponding to Item1 , Item2 , Item3 , Item4 .
Connecting Pi XBee Arduino
We will have arduino connected on the other side with that will perform relay operation based on the information received from XBEE(child node).
The relevant arduino code is :
void setup() {
 Serial.begin(9600);
 pinMode(12, OUTPUT);
 pinMode(13, OUTPUT);
}

void loop() {
  char data=Serial.read();
  switch(data) {
  case '1': { digitalWrite(12, HIGH);
             digitalWrite(13, LOW);
            break;}
  case '2': {digitalWrite(12, LOW);
            digitalWrite(13, HIGH);
            break;}
  case '3':  {digitalWrite(12, LOW);
             digitalWrite(13, LOW);
            break;}
  case '4': {digitalWrite(12, HIGH);
            digitalWrite(13, HIGH);
            break;}
            }
 delay(50);
}
Compile this code on arduino module using their IDE .
Make sure the relays are connected to correct Pin of arduino and Pi. Run the script on Pi and turn on supply for XBees and relays to see things in action.